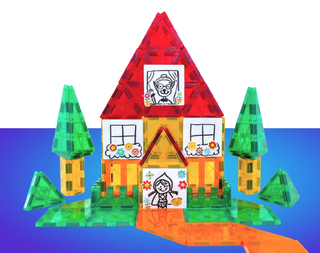
Little Red Riding Hood
Lesson Plan
Age of Students:
- 4-6 years
Materials:
- Magnetic tiles
- Internet
- One stuffed animal or other toy
- Audio visual aids
- Colors
- Cards and pictures of the house
- Cardboard roll
Vocabulary:
- Square
- Triangle
- Pyramids
- Rectangle
- Garden
Objectives:
After this lesson plan:
- Students will be able to identify different shapes.
- Students will be able to recognize the colors.
- Students will be able to describe where the shapes are in relation to one another with terms like:
- Above
- Behind
- Below
- Beside
- In front of
- Next to
Introduction:
First of all the mentor will activate the prior knowledge of students by providing audio visual aids to the students. He/ She will show them a short video of Little Red Riding Hood
https://youtu.be/ivg_Yc-YDYo. This short activity is the best way to make the students active in the class. They will also become familiar with the characters, pictures and the story.
Teacher - Student Activity:
The mentor will hold up the magnetic tiles of triangle and introduce the shape to the students. Teacher will describe the name of the shape to the students by pronouncing it. The teacher will paste some pictures of triangular shape in the class before this activity and ask question:
- Find out some pictures in the class that have a triangular shape. Students will find the pictures and paste them on the board.
Teacher- Student Activity:
Now again the teacher will hold up the square magnetic tile. The teacher will show students some objects which are square in shape like a box, dice and a napkin. Teacher will hide some objects in the garden behind the tree, beside the bench and next to the fountain. Students will go outside and find the objects.
Now the students are familiar with the shapes which the mentor wants to use in making Little Red Riding’s house. Now teacher will come on the basic lesson.
Teacher - Student Activity:
Using cardboard roll the mentor and students will make puppets of Red Riding Hood and the wolf. This is an easy activity that the students can do on their own. They just need to color the cardboard rolls, one red and one brown. Then they can draw and color the faces of Red Riding Hood and the wolf on paper and cut them out and glue them to the rolls.
Student - Student Activity:
The mentor will divide the class into 4 groups. Teacher will provide the pictures of the house and magna tiles of square and triangular and rectangular shapes to the students. They will attach the magnetic tiles of different shapes with the help of a teacher. They will make walls, floor,
windows. roof, terraces through magnetic tiles shapes. They will make trees by placing triangles. The link to this process is here.
www.tytanproducts.com/blogs/news/how-to-create-a-fairy-tale-house-red-riding-hood
- After each group is done creating, have each small group share their creation with the whole group. Ask the students what shapes they used in making their creation.
- Ask each group to count how many shapes they used in their creation. Have the students from the group write the number on a dry erase board.
- Ask each group to count how many triangles they used in their creation. Have the students from the group write the number on a dry erase board.
Extensions:
After completing the activity, have each student draw a picture of his/her object and write how many triangles and how many squares he/ she used.
Assessment:
- One-on-one, have a student tell you the name of a shape.
- For a group assessment, have the students draw a picture of the shape that the mentor asks them to draw.

